Adding additional admin accounts in WooCommerce is crucial because it lets you delegate tasks like managing orders, updating products, and handling customer queries without sharing your main login. It keeps everything secure and organized.
Managing orders, on the other hand, is the heartbeat of your store—it’s how you track what’s been sold, process payments, and ensure customers get their products on time. If you don’t stay on top of orders, you risk delays, unhappy customers, and lost sales.
In this tutorial, we are going to show you how to add an additional user to your store to help you manage your store. We are also going to show you how to process the orders effectively.
1. Adding a shop manager to your store
Adding a store manager is very easy, and we are going to show you how. First, you need to go to the dashboard of your store and then head over to “Users”, and then go to “All users”. Wait for the screen to load.
From here, you will see all the users who can interact within your store. Currently, we only have one administrator (who is you in this case) and one customer. You can filter the users by clicking on the user roles located at the top of the screen. The administrator has full access to the backend of the store and can view or change almost anything.
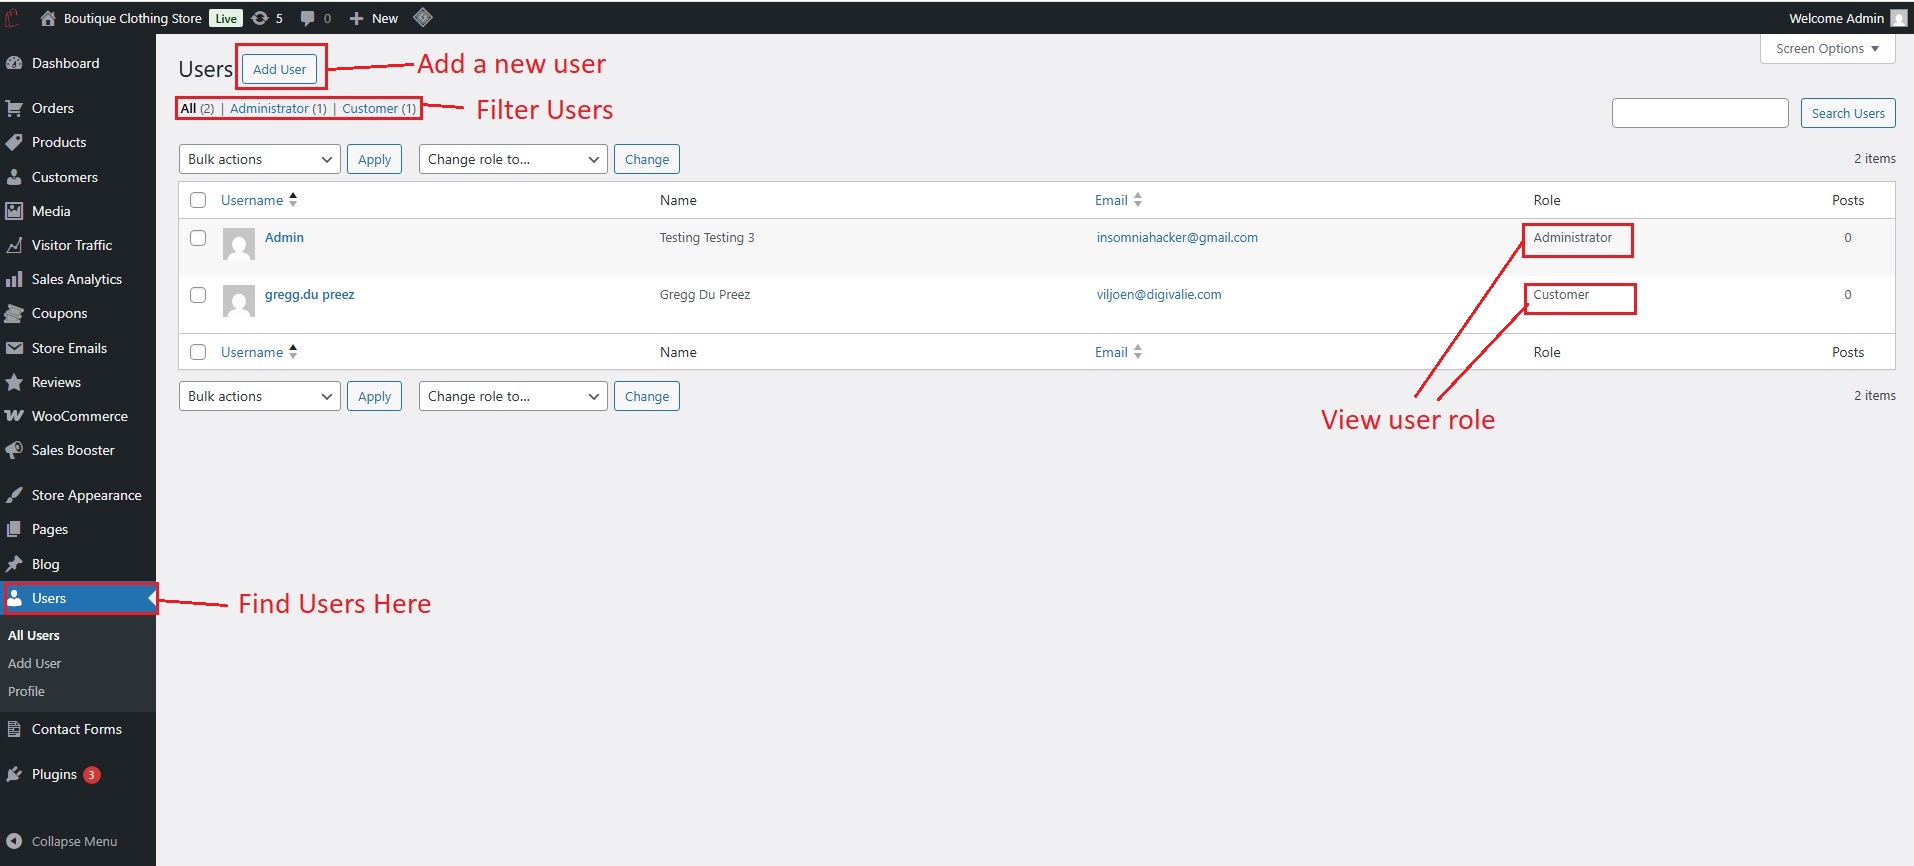
If you want to add an additional user to the store to help you with the order, but you do not want to give them full access to your store, then you can add them as a shop manager. The shop manager has enough access to help with the order processing, but cannot change the store settings.
To add a shop manager, you need to click on the “add user” button located at the top left of the screen. From here, you should add a username and the email address of the store manager that we created in step 8. By this point you should already have given your new store manager access to their email account.
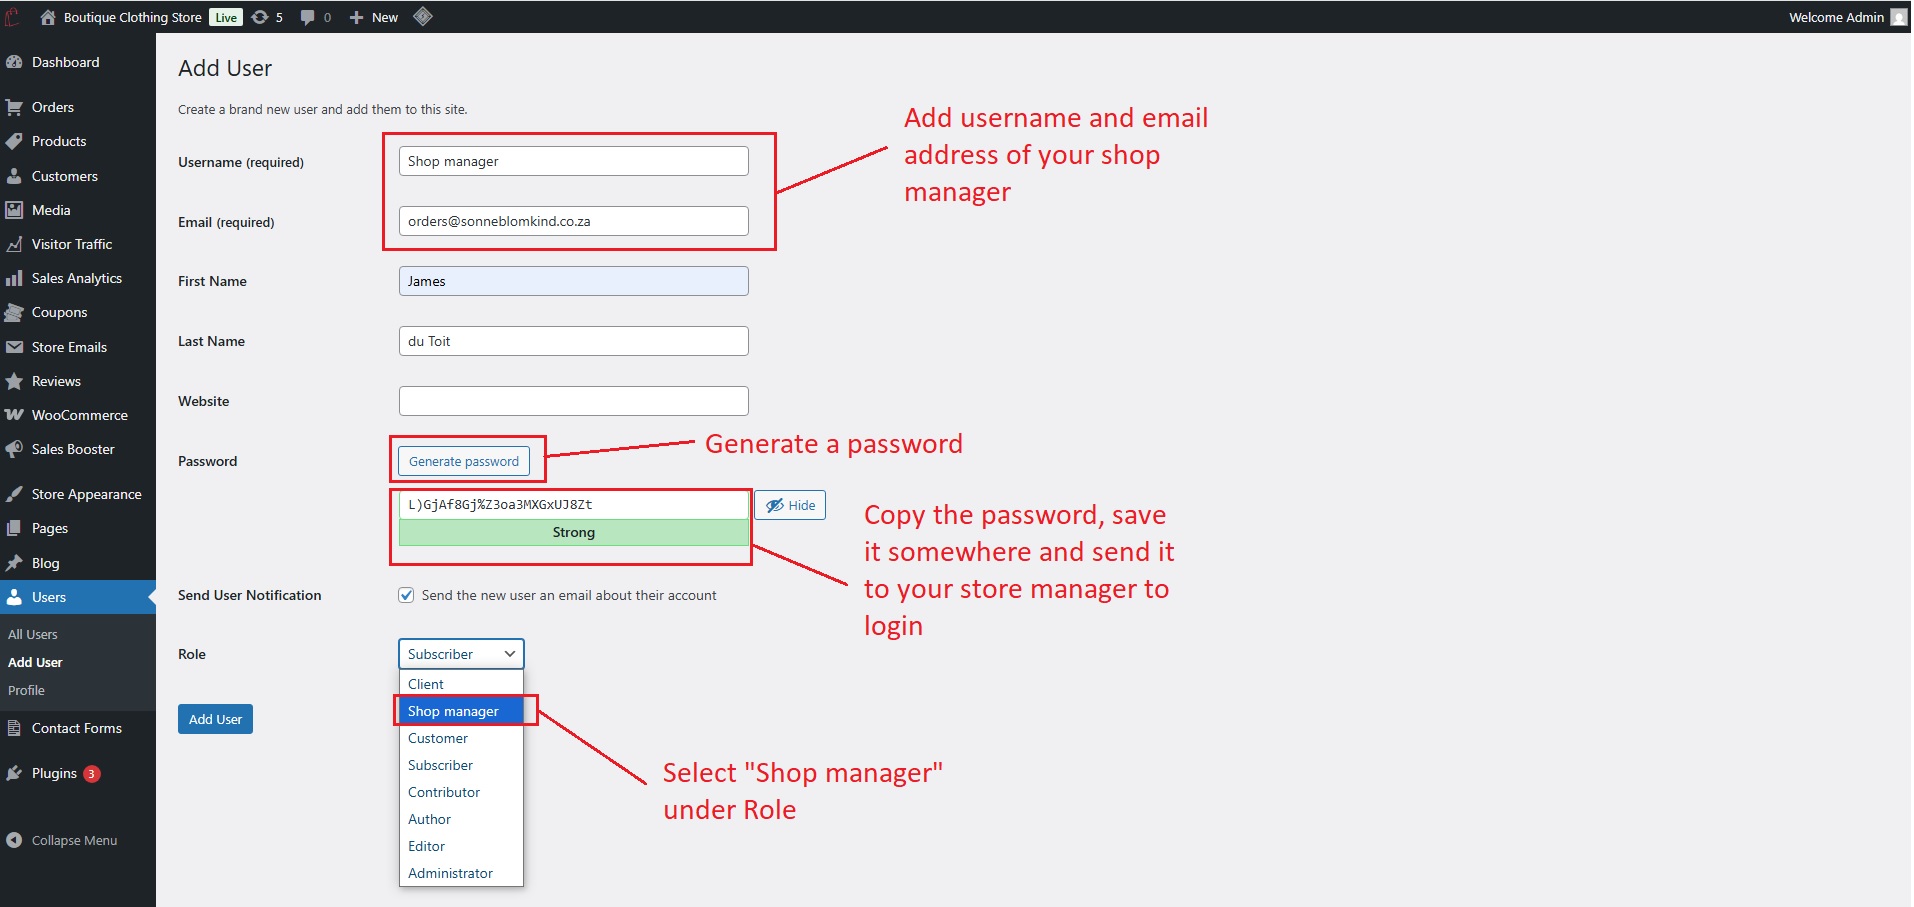
You can also add their first name and last name if you want to. We recommend leaving the website field open. You can also generate a password for your store manager that they can use to log in. Remember to copy the password that you generated somewhere safe and then send it to your store manager.
You also have the option where WordPress will send a welcome email to your store manager regarding their account. The last and most important step is to select their user role. Make sure that you select the shop manager and not anything other user role, such as Administrator.
It is crucial that only you or someone whom you can trust be granted the role of administrator. If you grant a random person the role of administrator, then they can cause havoc on your store, and this is something that we want to avoid.
Once all the information is added and selected, you can then click on the blue “Add User” button to add the user.
2. How to manage the orders
From within the dashboard itself, you will see a quick summary of all the orders and their status. You can view the net sales that you made for the current month, your top-selling product, orders that are awaiting processing, or those that are on hold. You can also see the number of products that are low in stock and out of stock.
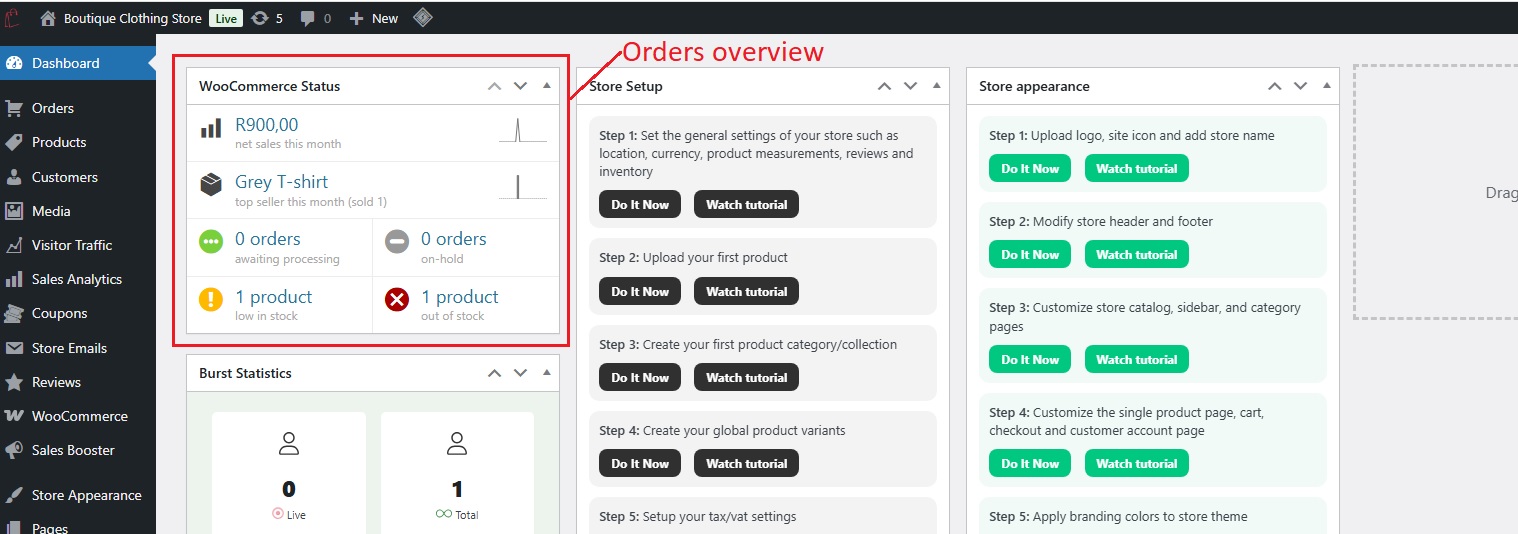
You can also click on each of these summaries to go to the respective section in your store. To get a full overview of your orders, you need to go to the orders menu located on the left sidebar.
Order details
You will be presented with a list of all the orders and the status associated with them. You will also see the order number and the name of the customer who created the order.
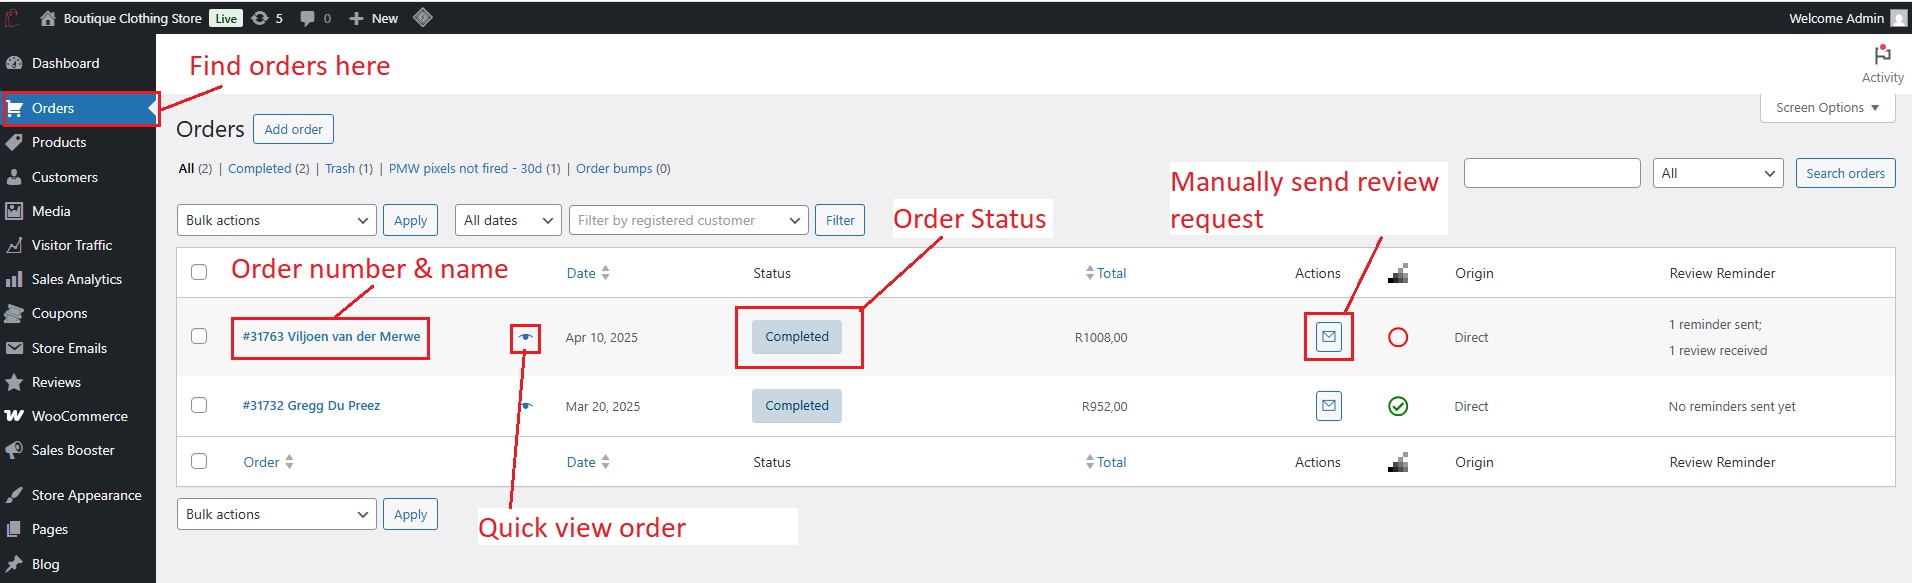
From here, you can also manually send a review reminder to the customer for that order. We highly recommend that you only send manual reminders to customers where the order status is marked as completed. The order review process is also automated and set up within step 8, so you do not need to manually send reminders.

You can click on the eye icon if you want to get a quick preview of the order. To view more details of the order, you can click on the order itself. A new page will open up, giving you an in-depth view of the order. You will see important information such as the payment method used to create the order, the order status and customer name.
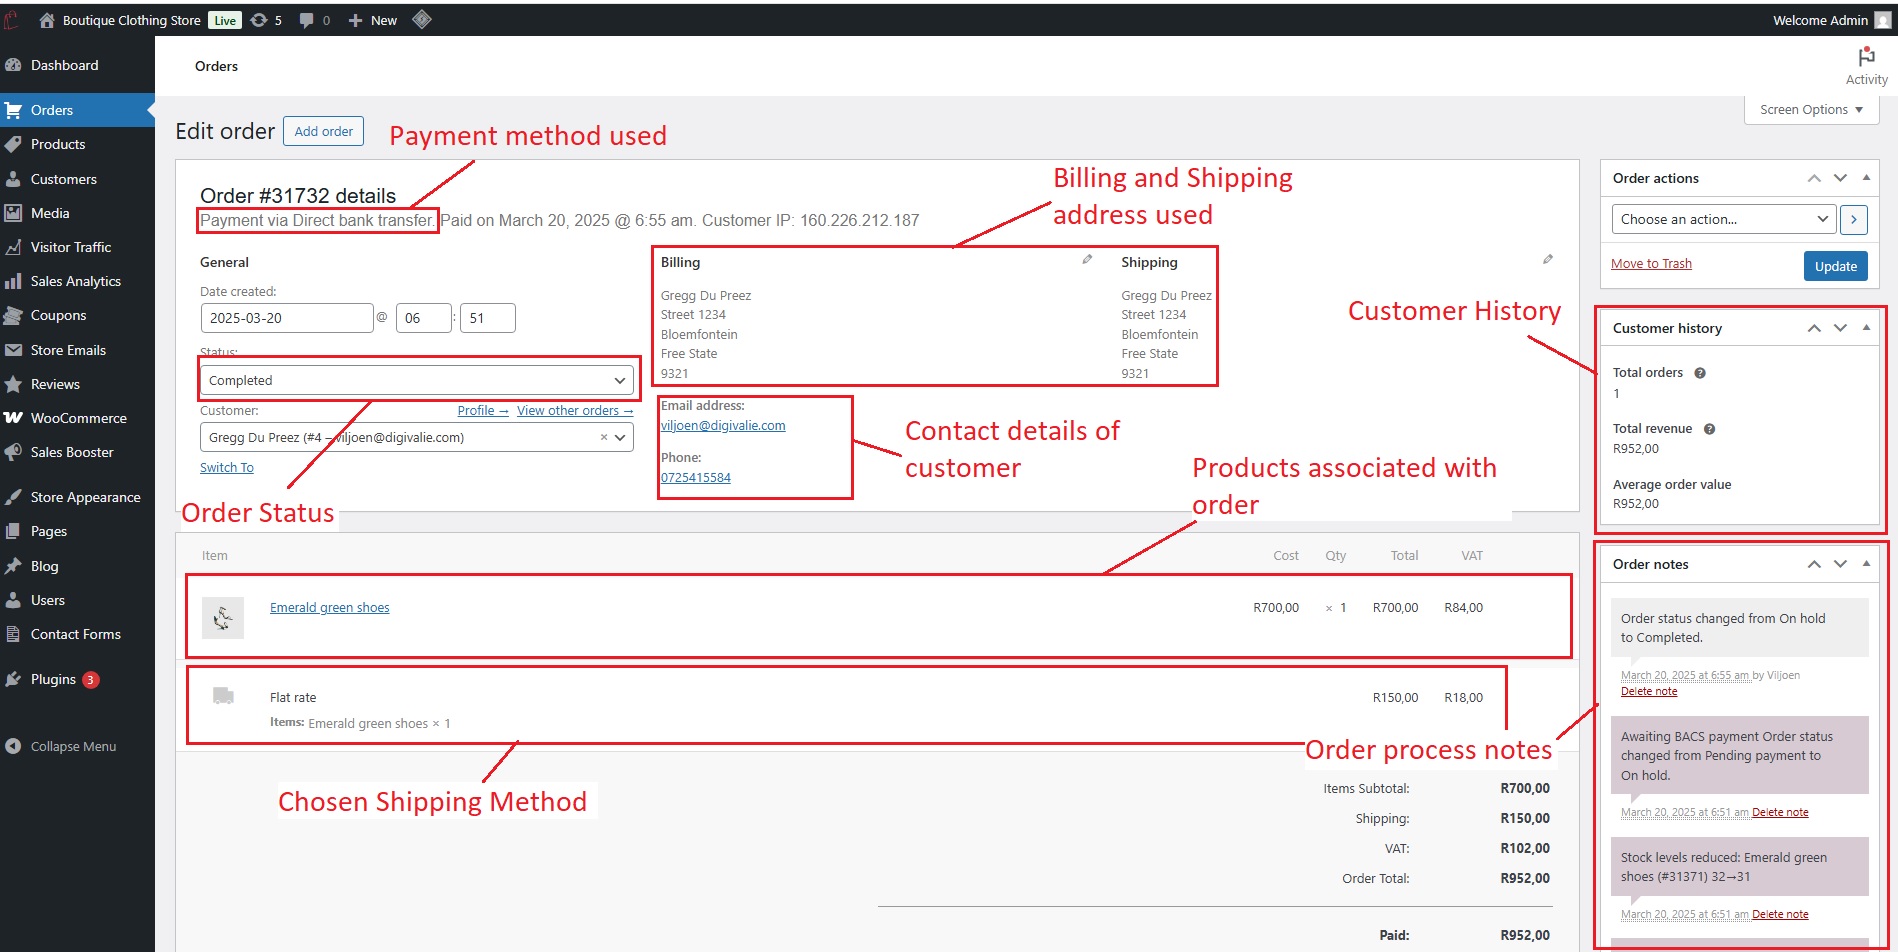
You will also see the billing and shipping information. The shipping information, such as the location containing the town, postal code, and physical address, must be communicated through to the shipping company that you plan to use to courier the order to your customer in time.
You will also have the contact details of the customer, such as their email address and phone number. This information is very useful to open a contact channel between you and your customer.
Underneath the customer’s personal information, you will see a list of all the products that were purchased along with each product’s quantity. You will also see the shipping method that the customer chose to ship their product.
There is also some important information on the right sidebar. From here, you can see the customer history in regards to their past orders, total revenue and average order value. Under the customer information, you will see the order notes which will give you a brief overview of each action that was taken within that specific order and also the next steps that should be taken.
If there are any fields that you want to remove from the screen, then you need to scroll up and open the tab labeled “Screen Options”. From here, you can enable or disable any of the elements on the screen whenever it becomes too cluttered.
Order statuses explanation
Now, we think it is time to explain each of the order statuses and what they mean. For additional documentation on order statuses, you can view this document from Woocommerce. Below is a list of all the order statuses and their meaning.
- Pending payment – All of your orders will start with this status. This status means that the customer has already started with the payment process but the payment is not yet confirmed. This status happens right after the customer has placed the order. This process is awaiting customer action, and there is nothing you should do from your side.
- On hold – This order status usually appears during offline payments, such as direct bank transfers, where no payment processors were used. You will need to wait for the customer to pay you through online banking, and the stock of your products will also be reduced. During step 7 within your store’s dashboard, you will learn more about payment methods. Once you receive a notification from your bank regarding the payment, you will then need to manually change the status to “Processing”.
- Processing – Once the payment of the order has been successfully received then the status will change from “Pending payment” to “Processing”. Whenever your customers use a payment gateway such as Payfast, then the status will automatically update from “Pending” to “Processing”. The next step is to start packaging the products and start with the shipping process to get the order to your customer’s location.
Usually, the courier company will either email or WhatsApp the customer to notify them about the collection of the product. From there, they will update the customer on details such as the shipping status and estimated time of delivery.
- Completed – Once the order has been successfully processed, shipped, and delivered to the customer, then you need to manually update it from “Processing” to “Completed”. The courier or shipping company that you use will send you an email whenever the order is delivered. The processing of the order is now finished.
- Canceled – Whenever the order status has moved to cancled, then it means it was either stopped by you or the customer. The stock will then be returned to the inventory, and you will have to give the customer a refund by using your payment processor.
- Refunded – The refunded order status comes into play whenever you have processed the customer’s refund successfully. We will explain later in this tutorial how refunds work.
- Failed – The “Failed” status means the order couldn’t be completed because of payment issues, like a declined card or insufficient funds. This only happens when the customer uses a payment gateway. If it happens, then you should contact the customer to offer an alternative payment method.
- Draft – The “Draft” status is perfect for when you’re manually creating an order but need to pause due to missing details. This will pause the order until you have received all the necessary information to process it.
How to change the status of an order
Now that you know what each status means, let’s show you how to change the status of any order. You should also keep in mind that an automated email notification will be sent to you or your customer whenever the status is updated. You can learn more about the emails within step 9 of your dashboard.
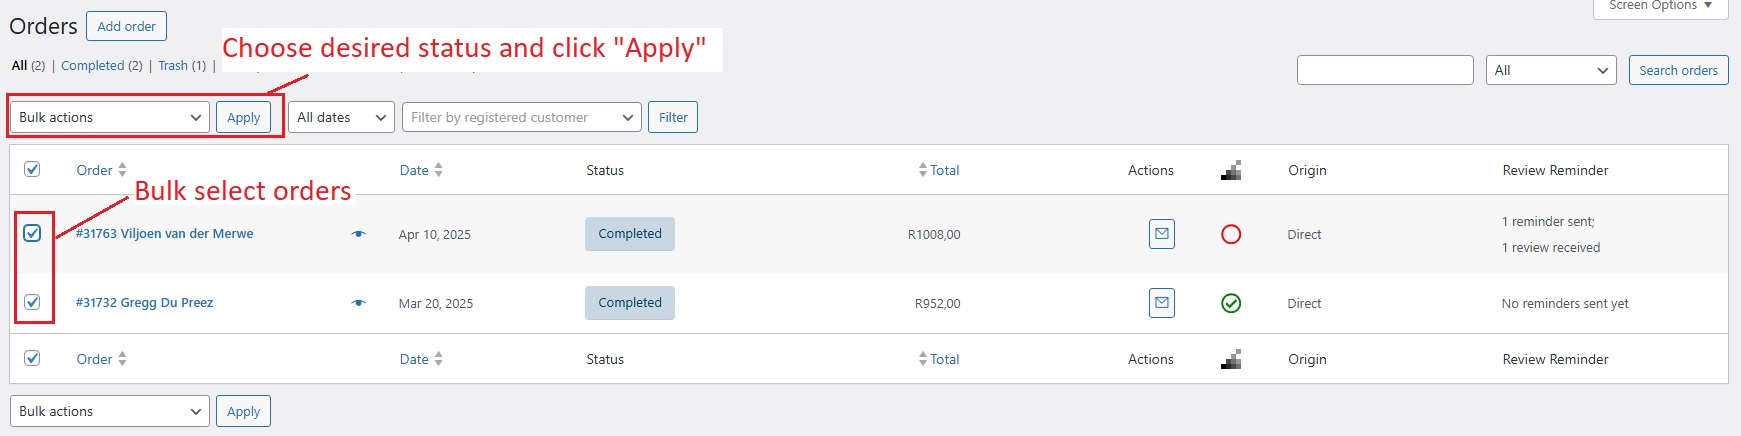
You can either change multiple order statuses at once or individually. If you have many orders that need to be updated, then you can go to the orders located on the left sidebar of your store dashboard. Once the page has loaded, you will be presented with all the orders in your store.
Click on the checkbox of each order that you want to update, and then go to the dropdown labeled as “Bulk actions”. Select the desired status that you want your orders to update to, and then click on the “Apply” button to update all the orders at once.
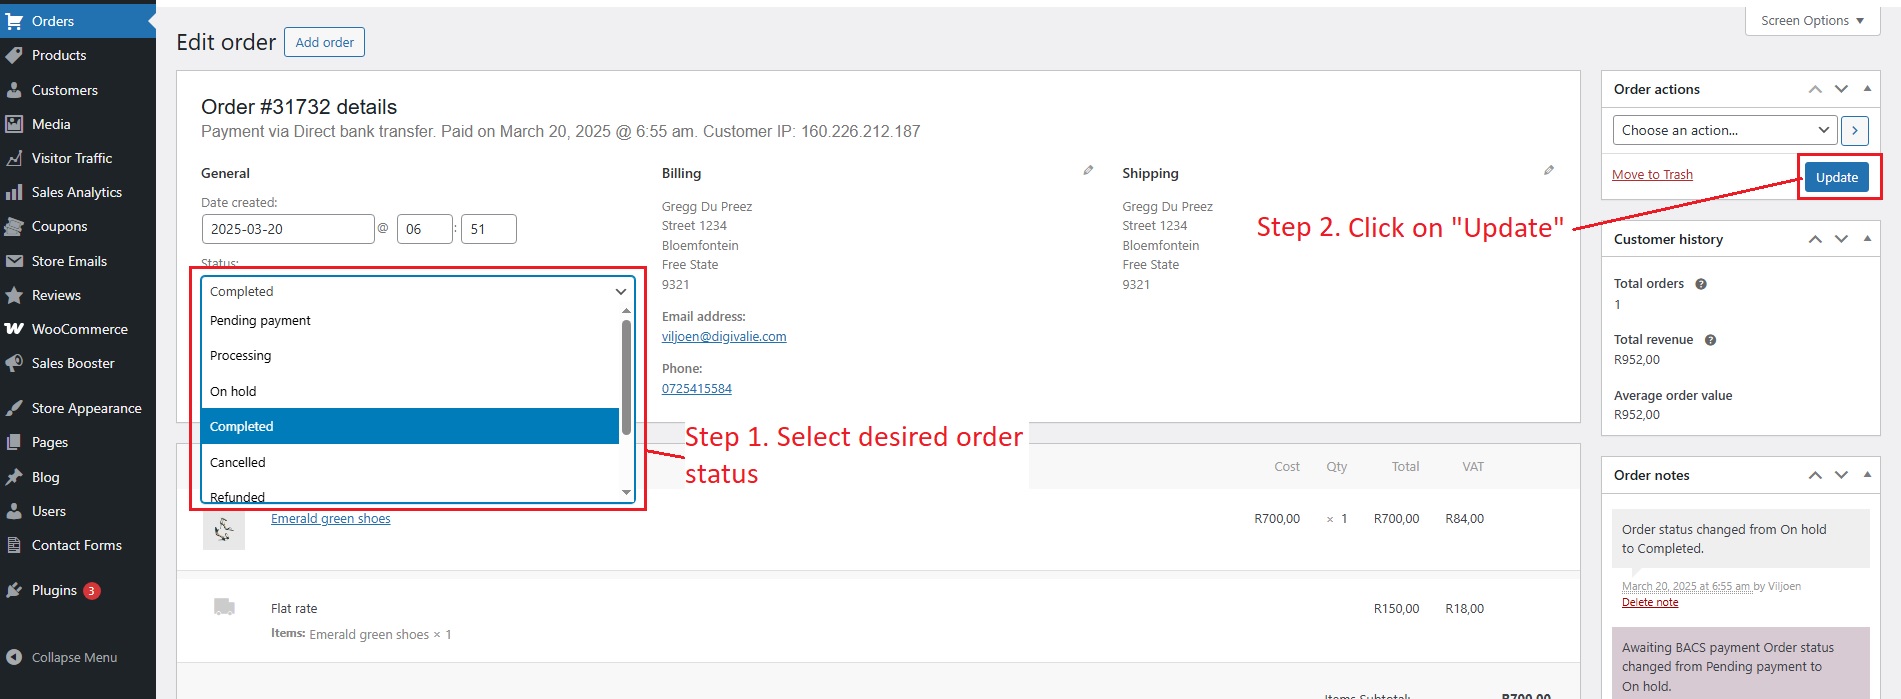
To change the order individually, you need to click on the order that you want to change. Click on the dropdown labeled as “Status” and then select the desired status. Once you have selected the status, you will then have to go to the blue button labeled “Update” located to the right of the screen. You will then see the status update right under your order notes.
How to refund an order
To refund an order, you need to go to your dashboard and then go to orders. Click on the order that you want to refund. Scroll down until you see the button labeled “Refund” and then click on it. Next, you need to change the quantity of the products that you need to refund, which is helpful if the customer bought more than one product, but only wants to refund one item while keeping the rest. You can also choose whether to restock the items that are refunded by enabling the checkbox. You can add the reason for the refund, which will also be visible to your customer.
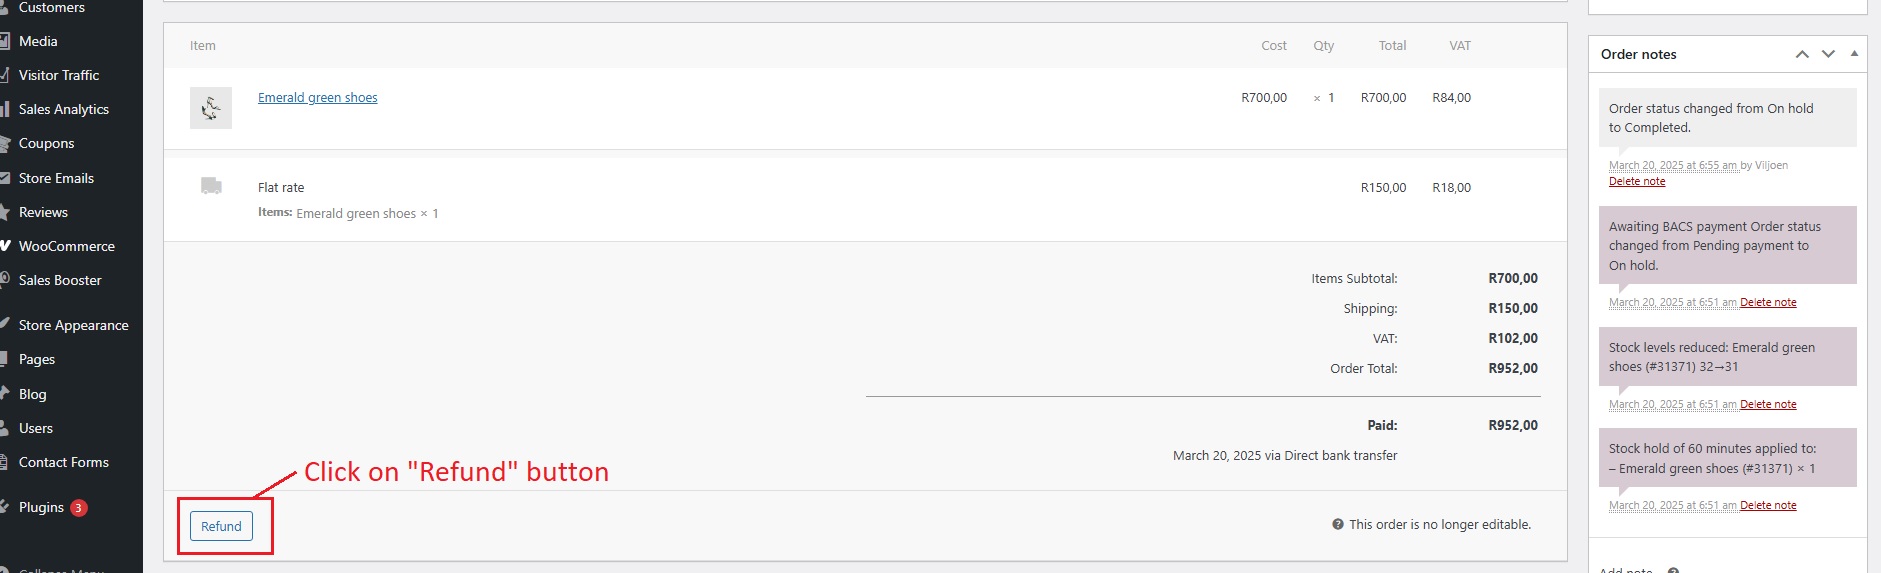
Once done, you then need to click on the refund amount button. If your payment processor supports refunds, then it will automatically send the money back to your customer. You should also double-check with your processor to make sure the payment was reversed.
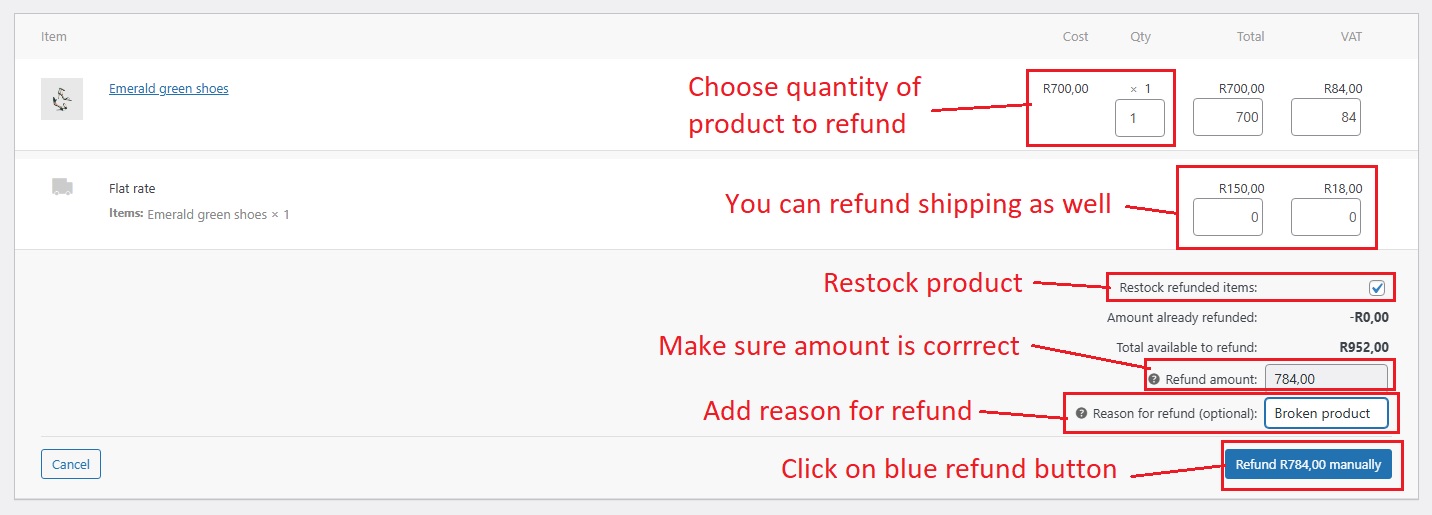
If you used methods other than a payment processor, like “direct bank transfer,” then you need to do the refund manually by paying them back through online banking. In this case, the order was paid through direct bank transfer, which is why the blue button states “Refund the amount manually”.